
"""
@Author: Aseem Jain
@profile: https://www.linkedin.com/in/premaseem/

"""
import os
import pymongo

# configure credentials / db name
db_user = os.environ["MONGO_ATLAS_USER"]
db_pass = os.environ["MONGO_ATLAS_PASSWORD"]
db_name = "sample_mflix"

connection_string = f"mongodb+srv://{db_user}:{db_pass}@sharedcluster.lv3wx.mongodb.net/{db_name}?retryWrites=true&w=majority"

client = pymongo.MongoClient(connection_string)
db = client[db_name]

# create database back directory with db_name
os.makedirs(db_name, exist_ok=True)

# list all tables in database
tables = db.list_collection_names()

# dump all tables in db
for table in tables:
    print("exporting data for table", table )
    data = list(db[table].find())
    # write data in json file
    with open(f"{db.name}/{table}.json","w") as writer:
        writer.write(str(data))

exit(0)
Category Archives: mongoDB
How to execute mongo commands through shell
Lets say you need to find out which is the primary node in the mongo cluster in your shell script,
mongo –host 10.126.71.162 –username=userid –password=secret –eval “db.runCommand(‘ismaster’).primary”
This would quickly open the mongo shell and execute the commands, and give the output as the last line
MongoDB shell version v4.0.5
connecting to: mongodb://10.126.71.162:27017/?gssapiServiceName=mongodb
Implicit session: session { “id” : UUID(“65f2e5ab-aa97-4306-8a20-afd70a4ceeb0”) }
MongoDB server version: 4.0.5
10.126.71.162:27017
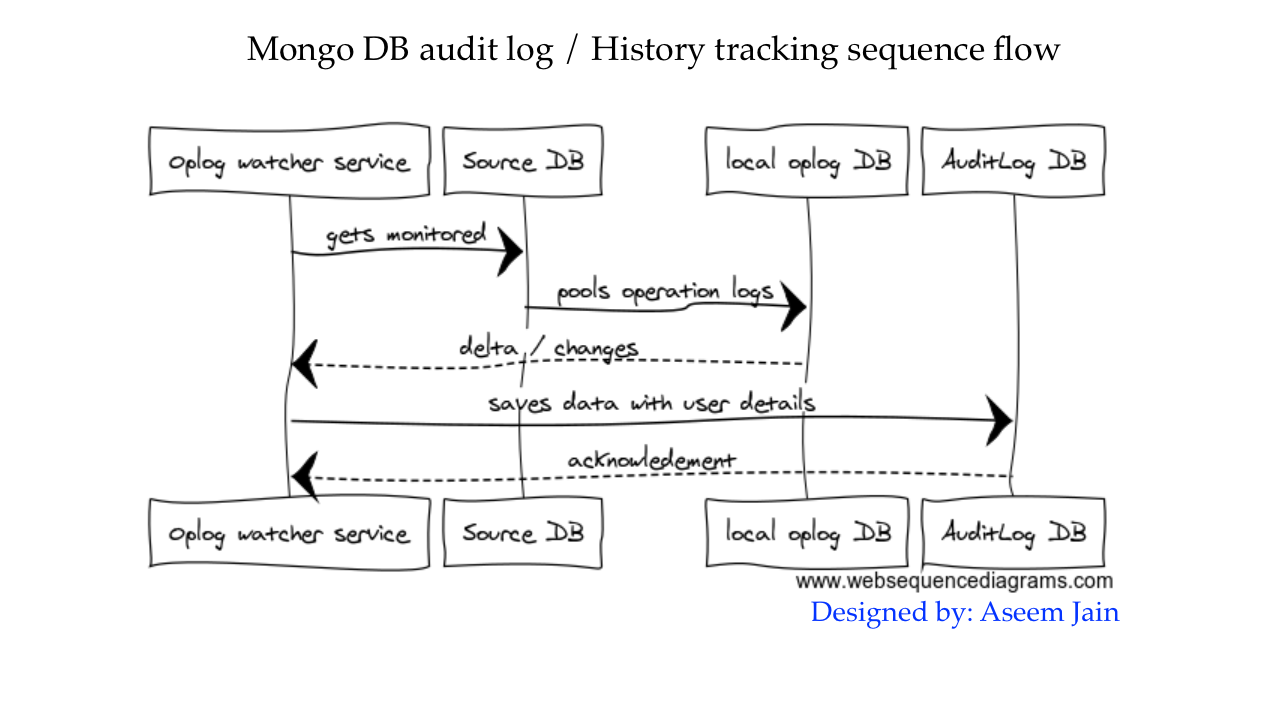
MongoDB : History tracking micro service
Mongo DB local -> oplog.$main collection keeps records of all changes which happen in the primary database, which are eventually read by secondaries to catch up data or syncup data in the mongo replica set.
A micro service can be written, which can pull up data / delta form oplog.$main based on the name space ( defined db and collection) and can save that data in destination Db or audit DB.
Later on audit DB can the queried to fetch the history or log data pertaining to entity.
Architecture: How mongodb replication works and secondary node get data from primary node
Here is the simple diagram which explains how the middle man oplog watches/monitors primary and pull any new operation or changes happened on primary and records them in oplog, which eventually get read by all secondaries to update them selves.
- insert operation happened in primary
- Operation got logged in oplog ( which is part of local db – oplog.$main )
- Secondary reads data from oplog and update them selves.

MongoDB : How to write Stored Procedures in MongoDB
The first thing you need to know is that MongoDB stored procedures are written in JavaScript. This feels pretty strange at first, but in actual fact it’s far more satisfying to program in a real language than in any of those vendor-specific SQL-based concoctions. It’s also very powerful: MongoDB uses the same JavaScript runtime as FireFox, so you have pretty much every feature of the language, including closures, Iterators and XML support via E4X.
So in MongoDB, a stored procedure is really just a JavaScript function, which must be stored in a special collection named db.system.js. Imagine a simple function like so:
function addNumbers( x , y ) {
    return x + y;
}
To convert that to a stored proc, just insert it into db.system.js:
> db.system.js.save({_id:"addNumbers", value:function(x, y){ return x + y; }});
Stored procs can be viewed, altered and deleted in the same way as any document in any collection, as that’s all they are. So we can check that our code was successfully stored by using a simple find():
> db.system.js.find()
{ "_id" : "addNumbers", "value" : function cf__3__f_(x, y) {
    return x + y;
} }
Ignore the machine-generated function name. That looks good, and we can start to actually use the proc. That’s done using db.eval():
> db.eval('addNumbers(17, 25)');
42
That’s all pretty simple, I think.
Python : Dictionary comprehension
Before updating a no sql or mongo doc you need to ensure that you are not adding keys which are not part of initial doc then dictionary comprehension is really helpful.
What it means, is you are able to create a dict (json object) dynamically in single line of code using loops, condition, construction every thing together.
Single line comprehension
items_to_update = {key: value for key, value in payload.items() if key in req_items}
multi line interpretation
if key in req_items:
….for key, value in payload.items():
…….. dictionary[key]=value
Detailed example of created update doc dic before inserting in mongo db
try:
    req_items = ["property1","property2"]
    items_to_update = {key: value for key, value in payload.items() if key in req_items}

    if items_to_update:
        logger.info("Updating device collection with {}".format(items_to_update))
        self.db.update({"filter": filter}, {"$set": items_to_update}, multi=True)
        logger.info("Successfully updated product details")
except PyMongoError as e:
    logger.critical('Pymongo Exception {}'.format(str(e)))
except Exception as e:
    logger.critical('Exception {}'.format(str(e)))
asd
MongoDb : Add user to DB
use myDb
db.createUser(
   {
     user: "accountUser",
     pwd: "password",
     roles: [ "readWrite", "dbAdmin" ]
   }
)
Login with admin role, use your db and create user with role.
Mongodb – can’t login via -u root -p bitnami
Are you trying to login like this?
mongo admin --username root --password YOUR_PASSWORDwhere YOUR_PASSWORD is the one you can see in your AWS system log:
Setting Bitnami application password to 'YOUR_PASSWORD'If this doesn’t work, you can also try resetting MongoDB password:
http://wiki.bitnami.com/Components/mongoDB?highlight=mongo#How_to_reset_the_MongoDB_root_password.3f
MongoDb : Case in-sensative search using pymongo
As we all know Json is case sensitive and so is MongoDB, hence searching same name which got save in different case might not return any result. The solution is to do case in-sensative search.
Below is the example of pymongo
db.users.find_one({'name': re.compile(username, re.IGNORECASE)})MongoDB : Java program to do basic crud operation
Sample Java program to connect MongoDb and perform Crud Operations.
Copy paste, run and learn 😉
note :- Please ensure you have installed mongo dependency using jar, github or mvn
package com.premaseem.core;

import com.mongodb.*;

import java.util.Date;

/**
 * Java + MongoDB Crud operation example
 *
 */
public class App {
    public static void main(String[] args) {

        try {

            /**** Connect to MongoDB ****/
            // Since 2.10.0, uses MongoClient
            MongoClient mongo = new MongoClient("localhost", 27017);

            // or, to connect to a replica set, with auto-discovery of the primary, supply a seed list of members
//            MongoClient mongoClient = new MongoClient(Arrays.asList(new ServerAddress("localhost", 27017),
//                    new ServerAddress("localhost", 27018),
//                    new ServerAddress("localhost", 27019)));

            /**** Get database ****/
            // if database doesn't exists, MongoDB will create it for you
            DB db = mongo.getDB("testdb");

            /**** Get collection / table from 'testdb' ****/
            // if collection doesn't exists, MongoDB will create it for you
            DBCollection table = db.getCollection("user");

            /**** Insert ****/
            // create a document to store key and value
            BasicDBObject document = new BasicDBObject();
            document.put("name", "premaseem");
            document.put("age", 30);
            document.put("createdDate", new Date());
            table.insert(document);

            /**** Find and display ****/
            BasicDBObject searchQuery = new BasicDBObject();
            searchQuery.put("name", "premaseem");

            DBCursor cursor = table.find(searchQuery);

            while (cursor.hasNext()) {
                System.out.println(cursor.next());
            }

            /**** Update ****/
            // search document where name="premaseem" and update it with new values
            BasicDBObject query = new BasicDBObject();
            query.put("name", "premaseem");

            BasicDBObject newDocument = new BasicDBObject();
            newDocument.put("name", "premaseem-updated");

            BasicDBObject updateObj = new BasicDBObject();
            updateObj.put("$set", newDocument);

            table.update(query, updateObj);

            /**** Find and display ****/
            BasicDBObject searchQuery2
                    = new BasicDBObject().append("name", "premaseem-updated");

            DBCursor cursor2 = table.find(searchQuery2);

            while (cursor2.hasNext()) {
                System.out.println(cursor2.next());
            }

            /**** Done ****/
            System.out.println("Done");

        }  catch (MongoException e) {
            e.printStackTrace();
        }

    }
}
